Tutorial on running Nodejs in Heroku
Posted in Tutorials


In this tutorial, we will show you how to get started running NodeJs in a cloud hosting such as Heroku. If you are not familiar with Heroku, here is our getting started Heroku tutorial. This tutorial is based on the more detailed guide in Heroku Dev Center.
In this tutorial, we will be calling our app “example”. But when you do it, give it your own name.
1. In the Git Bash, navigate to a directory that we created called “tutorials” with something like …
cd /c/tutorials/
and login with “heroku login” and entering your email and password to your heroku account.
2. Also log into the Heroku web dashboard and create a new app called “example” and copy the “git clone” command.
3. In the Git Bash, run this git clone command. This clones the newly created app in the dashboard to your local machine. It will say that you “appear to have cloned an empty repository”. That’s okay. It won’t be empty for long. The clone command would have created an “app folder” for you (in our example it is “example”). CD into that folder now. We now write some code on our local machine in the “example” folder.
5. Make a file called app.js with the following content.
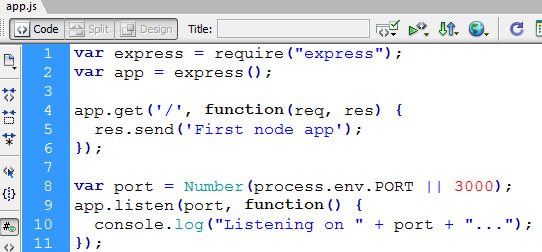
sample app.js code
The process.env.PORT is actually important here. This is the environment variable on Heroku that contains the port number. When on the Heroku cloud, the app will listen on this port. But on local machine, it will listen on port 3000.
Our First NodeJS app
Here is the code for our first node app…
var express = require("express");
var cons = require("consolidate");
var app = express();
app.get('/', function(req, res) {
 res.send('First node app');
});
var port = Number(process.env.PORT || 3000);
app.listen(port, function() {
 console.log("Listening on " + port + "...");
});
Creating the package.json file
6. In order for heroku to know that you are creating a nodejs app, we need a package.json file.
We use “npm init” to create this package.json. Type “npm init” in the Git Bash at root directory of your app (in our case “example” folder). It will walk through the creation of package.json by asking you for the name of your app, the version (you can leave at 0.0.0), the description, and entry point (which you should put as app.js).
For “test command” and “git repository” leave blank. And default the rest. Now you have a package.json file.
Using ExpressJS on NodeJS
7. Nodejs is typically run with Expressjs (which is a node framework). We install express as a dependency with npm. Note that you should not rely on any system-level packages and that all of your app’s dependencies are declared in package.json. Type …
npm install express –save
in Git Bash. This added the dependency property in package.json …
“dependencies”: {
“express”: “~3.4.8”
}
And it also created “node_modules/express/” library folder in our app directory.
8. You should manually add the “engines” field such as …
“engines”: { “node”: “0.10.x” }
to package.json to indicate that your app is compatible with all versions of node at “0.10.x”. At the time of this writing. nodejs is at version 0.10.26
Also putting
“private”: true,
in package.json will tell npm to not publish it to its live directory.
9. Create a file named “Procfile” at your app root (“example” folder) with the line …
web: node app.js
This tells heroku how to run your app.
10. Deploy our app, with …
git add .
git commit -m “adding initial app”
git push heroku master
heroku ps:scale web=1
as described in previous tutorial.
11. Point your browser to your app (such as http://example.herokuapp.com/ where example is replaced by your app name). You should see your web app output “First node app”.
If you ever want to shut down your app (users will see application error page), you can scale dynos down to nothing…
heroku ps:scale web=0
Related Posts
Tags
Share This

