Tutorial on How to Create a WordPress Wiget Plugin
Posted in Tutorials


In this tutorial, we are going to create a WordPress Widget Plugin. Although we are going to create simple plugin, you do have to have some development experience with WordPress and PHP.
The plugin simply is going to call the PHP function gmdate() to display the GMT date and time (based on the server clock). Once you know how to involve native PHP functions from a working WordPress plugin, then you can expand upon it to do whatever you want with PHP (such as reading a JSON file, reading from database, whatever PHP can do).
This tutorial will show you how to create a widget that you can drag and drop into the widget area in the WordPress admin …
adding widget to sidebar
Let’s start.
1. Plugin Header File
In the WordPress folder /wp-content/plugins/, create a new folder called “displaytime” to hold our plugin files. This is where plugin files goes in WordPress. Each plugin should belong in its own folder here. We will call our plugin “Display Time” and name our folder “displaytime”. Strictly speaking the name of the plugin and the folder name does not need to match. But something close is good.
Inside displaytime folder, create the index.php file with the following header comment.
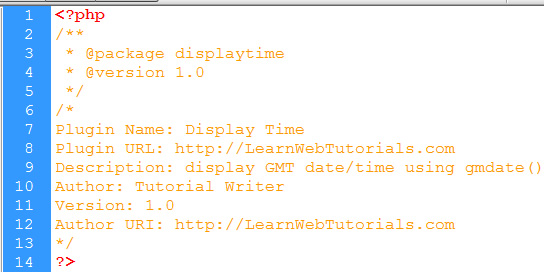
plugin header
Following the anatomy of a WordPress plugin, we put the Plugin Name, Plugin URL, Description, Author, Version, and Author URI. They should be spelled exactly as shown. This is not just for developers to read. But WordPress will also read this to determine the name, description, author, and etc to display in the Plugin Admin panel. Strickly speaking only “Plugin Name” line is essential in order for WordPress to recognize this as a plugin.
2. Creating a Widget Child Class
We extend the WP_Widget Class and call it parent constructor. Basically, we copy the template code from the WordPress Codex here.
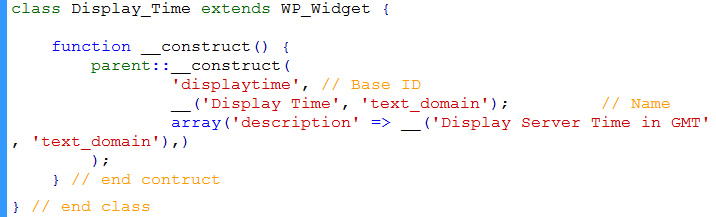
extend WP_Widget class
The first parameter to the constructor is an unique base id. The second parameter is the name of your widget. We are using the __() WordPress translation function so that the strings are internationalizable.
Third parameter is an array of properties. The description property is most commonly used. There is a trailing comma there in case you want to add more properties later. But PHP doesn’t mind it being there and that was how the sample codex code had it.
3. Widget Front End
Within the class, we write the widget() function to display the widget front-end. This is what the user would see on the site …
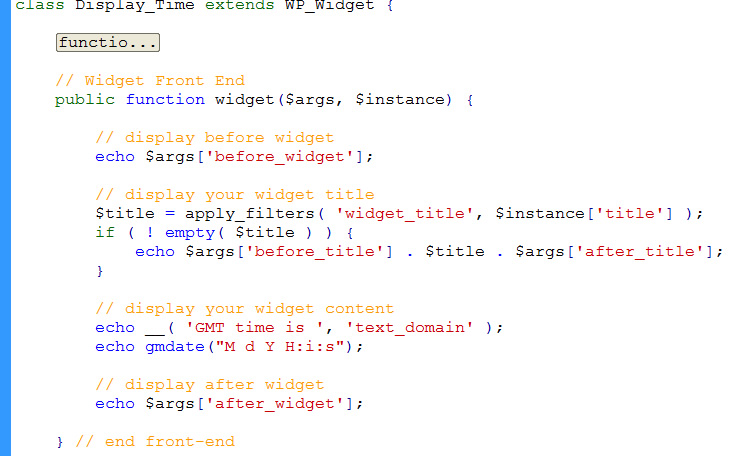
widget front end
It is like the Codex code, but I’ve re-order some of the statements and echo gmdate() call to display the GMT time. This function gives you access to $args and $instance which you can use in your function.
You should echo out $args[‘before_widget’] and $args[‘after_widget’] at the top and bottom of your outputted content. Wordpress has hooks and filters that may insert content into these.
Similarly, echo out $args[‘before_title’] and $args[‘after_title’] before and after output of your widget title. Your widget title is customizable by the admin in the WordPress admin backend. That customized value can be retrieved from $instance[‘title’]. But first pass it through “apply_filters” as shown so that WordPress hooks and filters can have affect on it if needed.
4. Widget Backend code
Then we also have to add the widget backend code. This is to display the Widget customization form in the WordPress admin widgets panel. The code may look complicated, but it is just a copy from the Codex. Even the class=”widefat” is from the Codex. So it must be a WordPress CSS class that styles the widget input boxes consistently.
The code essentially consists of a form content with a label and textfield for customization of the widget title…

widget backend code
You don’t need the <form> tag because the WP_Widget code will take care of that for you. The WP_Widget class also provied you with $this->get_field_id() and $this->get_field_name() to get the id and name of the title field for use as your “id” and “name” attributes of your input textfield.
For the value attribute of the input textfield, you get that value from $instance[‘title’] provided that it has been set in the admin by the administrator. If not, we display the default value of “Display Time” for the title. But before echoing out this value (because it consist of user/admin input), we should esc_attr() it.
5. Sanitize
Speaking of sanitizing user inputs, your widget may have options (such as the title). So these should be sanitized for security reason by calling strip_tags() on all user inputs. The update() function (which is called when the widget options are updated) is when to do it …
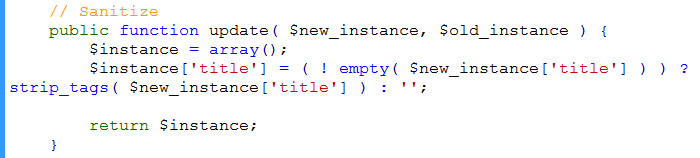
sanitize user inputs
The update() function from WP_Widget gives you access to the $new_instance and $old_instance. These are arrays of inputs. We only care about the $new_instance, which is the new values that the user is trying to save. We strip_tags these and return out a new array with all its values with HTML tags stripped.
6. Register Plugin
Now that we have finished writing the widget class, we have to register the widget. For simplicity sake, we will keep the code in the same file as the class …
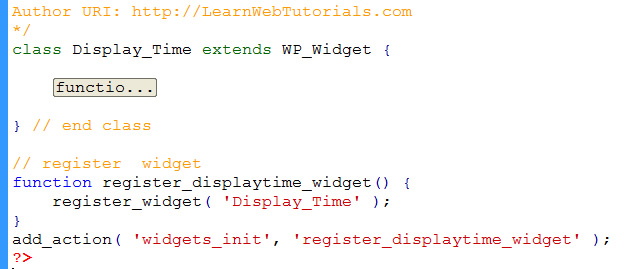
register widget
Here we add the “add_action” to the “widgets_init” hook. Now when WordPress initializes the widgets, it will also call our function “register_displaytime_widget”. And all our function register_displaytime_widget() do is to call …
register_widget(‘Display_Time’);
where “Display_Time” is the name of our widget class.
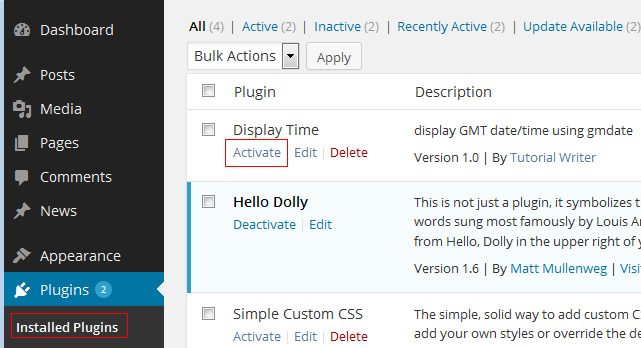
7. Activate Plugin
Upload the index.php plugin file to your server. In the Wordpress Admin under Plugins -> Installed Plugins, you should now see your plugin. Click the activate link to activate it…
activate plugin
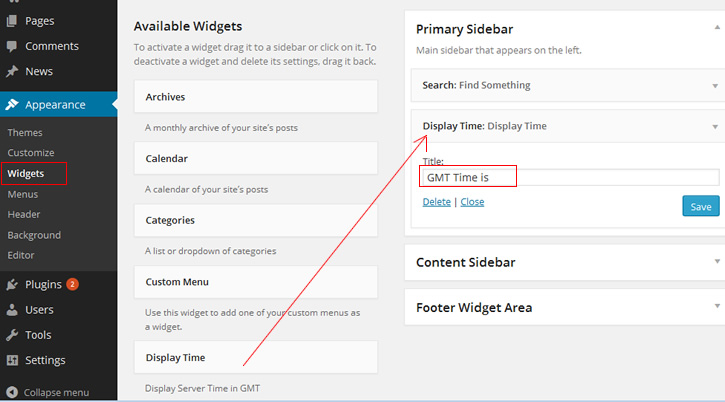
8. Adding Widget to Sidebar
In Appearance -> Widgets, you should now see “Display Time” as an available Widget. Drag it to a sidebar. You can customize the Title of the widget and click “Save”…
adding widget to sidebar
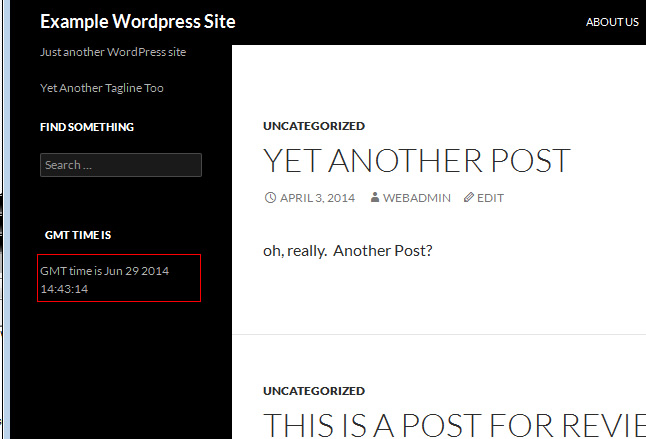
9. See Widget in Action
Once activated, you can see your widget displayed in the sidebar…
widget in sidebar
Note: This is a very simple tutorial on plugin and does not get into the other details of WordPress Plugin writing that needs to be taken into account before putting the plugin into production. Read 10 Most Common Coding Mistakes in WordPress Plugin to see what else to learn next before your plugin is ready for production use.
Related Posts
Tags
Share This

